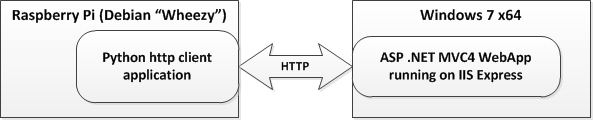
Now, let me start with the application running on Raspberry Pi. This is a very simple http client application that make use of the httplib library in python. It uses HTTP GET to read value from the ASP MVC4 WebApp application. This is the code:
import httplib

conn = httplib.HTTPConnection("192.168.137.1:8080")
conn.request("GET","/api/values/5")
r1 = conn.getresponse()
print r1.status, r1.reason
print r1.read()
As you can see, this application reads the value returned by the ASP MVC4 WebApp application at address http://192.168.137.1:8080/api/values/5. Before I continue explaining the ASP MVC4 portion, let's see the output of this application first when you run it and it gets response from the ASP MVC4 application:
As you can see, the ASP MVC4 application returned the string "value" to the application in the Raspberry Pi.
Now let's move to the ASP MVC 4 application portion. The application is a default application generated when you choose to make WebApp-style application in ASP MVC 4. To do so, create a new project in Visual Studio 2010 or 2012 (I'm using Visual Studio 2010), select Visual C# | Web | ASP .NET MVC 4 Web Application then select Web API. Once your application source code is generated, everything on the server side is actually finished. What's left is configuration to make the ASP application accessible to Raspberry Pi.
There are three steps to make the application accessible through an ethernet connection to the Raspberry Pi.
- Configure your application to use IIS Express.
- Change IIS Express configuration for your application to "bind" it to the ethernet interface that's connected to Raspberry Pi.
- Enable access to your Raspberry Pi through Windows 7 firewall.
The second step is quite complicated. You need to modify your current windows login account setting for IIS Express. The file is located in C:\Users\[YourLoginName]\Documents\IISExpress\config\applicationhost.config (assuming your Windows 7 user accounts data is in C:\). In the applicationhost.config, go to your application settings in the element(s) inside <site>. In my case this is how it looks like before I made changes:
<site name="MvcApplication1" id="2">
    <application path="/" applicationPool="Clr4IntegratedAppPool">
        <virtualDirectory path="/" physicalPath="D:\Experiments\WCF\MvcApplication1\MvcApplication1" />
    </application>
    <bindings>
        <binding protocol="http" bindingInformation="*:2086:localhost" />
    </bindings>
</site>
Now, to make it IIS Express listens on certain network interface, we need to specifically tell it about the binding. This is accomplished by adding new binding in the binding protocol section. This is what I added to that section:
<binding protocol="http" bindingInformation="*:8080:192.168.137.1" />This binds IIS Express to the network interface with IP address 192.168.137.1 at port 8080. The application (MvcApplication1) setting now turns into:
<site name="MvcApplication1" id="2">
    <application path="/" applicationPool="Clr4IntegratedAppPool">
        <virtualDirectory path="/" physicalPath="D:\Experiments\WCF\MvcApplication1\MvcApplication1" />
    </application>
    <bindings>
        <binding protocol="http" bindingInformation="*:2086:localhost" />
        <binding protocol="http" bindingInformation="*:8080:192.168.137.1" />
    </bindings>
</site>
Notice the change that happened in the binding protocol section. You can see similar explanation in this link: http://johan.driessen.se/posts/Accessing-an-IIS-Express-site-from-a-remote-computer.To test whether your IIS Express binding is working, run your application and use your browser to access the page from the ASP MVC4 application. For example, in my case, I use http://192.168.137.1:8080 to see wheter the binding works before I tried to connect from the python application in Raspberry Pi.
The last change to make is to tell the Firewall to accept access from the Raspberry Pi. In my case I made a custom rule in the Firewall (through the firewall configuration in Control Panel) to enable all traffic from the Raspberry Pi IP address to the specific interface I used in my Windows 7 machine. The link above also explains how to manually configure Windows Firewall from Windows command line.
Hopefully this helps ASP .NET MVC 4 folks out there who play with Raspberry Pi.
- The httplib python module exists in both python 2.7.x and 3.x
- If you want to run http server in Raspberry Pi with python you could use both python 2.7 and 3.2. Just use the SimpleHttpServer module or invoke it with "python -m SimpleHttpServer [port number to listen to]"
- Last but not least, I have changed my Raspberry Pi IP to static IP before conducting this experiment.
Post a Comment

No comments:
Post a Comment